Monday, June 27, 2011

Strawberry Cake

For weeks now I have been dying to try two things: a new strawberry cake recipe and decorating with buttercream roses! This kind of decorating is new territory for me, but with the birthday of our friend Jen taking place this past weekend, it was the perfect opportunity to celebrate her pre-30th birthday AND do some experimenting. Here's a preview of the finished product... see below for more details!

strawberry rosette cake


Cake Ingredients:
2 3/4 c AP flour
1/2 c cake flour (not self rising)
1 tbs baking powder
1 tsp salt
2 sticks butter, softened
2 1/4 c sugar
3 large eggs
1 large egg white
1 c whole milk (I used skim, and it worked fine)
1 1/2 tsp vanilla
2 c chopped fresh strawberries or pureed frozen strawberries

Preheat your oven to 350 degrees. Meanwhile, whisk dry ingredients together in a large bowl and set aside. Cream the butter and sugar with a hand mixer until it becomes light and fluffy. Add each egg, one at a time, and beat after each addition just until the egg has been incorporated. Beat in egg white.

Combine the milk and vanilla in a separate bowl and set aside. Add the dry ingredients to the butter mixture on low speed in 3 additions, alternating with the milk mixture, and ending with dry ingredients. Finally, stir the strawberries into your batter.

batter, pre strawberries


batter, post strawberries
(it was SO difficult to resist taking a little taste)

Grease two 9 inch round cake pans and fill each pan evenly with batter. Bake in the oven until a tester comes out clean. I'll be honest with you, I didn't watch the clock very closely (I know, shame on me) so I couldn't tell you precisely how long it took for the cakes to bake. I'd recommend checking on them at 20 minutes and then every few minutes afterwards until they are done. Remove the cakes from the oven and let cool completely on a wire rack.

While the cakes are cooling, make your buttercream according to the following recipe.

Buttercream ingredients:
2 c shortening
8 c powdered sugar
1/2 tsp salt
1 tbs vanilla
6 oz heavy cream
1/2 c finely chopped strawberries

In a large bowl, cream the shortening with a hand mixer until light and fluffy. Add the powdered sugar, 2 cups at a time, until well blended. About halfway through this process, my frosting got VERY thick and difficult to work with, so I added a little bit of the cream to soften it up. After all of the sugar has been incorporated add the salt, vanilla and remaining heavy cream. Blend until combined, then mix on high until the frosting is light and fluffy. Fold in strawberries. **This makes A LOT of frosting, which is needed for the rosettes, but if you will simply be icing a cake, you might consider cutting this recipe in half.**

Once the cakes have cooled, assemble your layers and cover in a good crumb coat. It does NOT need to be pretty, it just needs to be thick enough so that you aren't able to see any cake through the frosting. Example:


On to the really fun part! Assemble a pastry bag fitted with a Wilton 1M decorating tip, and fill the bag about half full with frosting. Work around the side of the cake first. Beginning in the center of the rosette, hold your decorating tip at a 90 degree angle to the cake, and make a circle around the center point. You will likely need to loop around twice so that the rosettes cover the height of the side of your cake. Once you've made your way around the entire cake, it should look something like this:
half-way there...

Next, cover the top of your cake using the same method.

ta-da! all finished.

The roses weren't as neat and tidy as I would have liked. However, considering this is my first attempt, I'm pretty happy with how it turned out.

I think the roses would hold their shape better with a less creamy/more stiff buttercream. That's something to look into for next time. Until then, have fun and happy baking! :-)

up close detail


pretty AND delicious!
Sunday, June 19, 2011

Happy Father's Day Weekend

Happy Father's Day to the most amazing father, friend, and role model that a girl could ever ask for. Love you... xoxo!


It's only when you grow up, and step back from him, or leave him for your own career and your own home—it's only then that you can measure his greatness and fully appreciate it. Pride reinforces love.  ~ Margaret Truman

Wednesday, June 15, 2011

When life hands you lemons...

You make lemonade, and lots of other yummy treats!

Every Sunday I do our grocery shopping for the week, and this past weekend I couldn't help but notice that lemons were on sale. So, on impulse, I bought a bag full of them. I know it sounds strange, but I love everything about lemons: I love the smell of freshly squeezed lemon juice, I love their bright and cheerful color, and I love how they make me think of summertime.

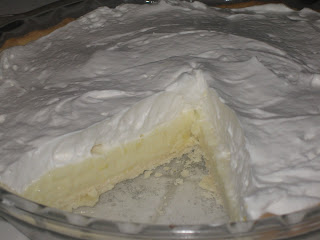
I immediately came home from the store and decided on a lovely...and lemony... menu for one of our weeknight dinners. In celebration of our newly painted kitchen (more on that later), and since I was home from work just a tad earlier than usual, tonight worked out perfectly. On the menu: chicken piccata, lemon orzo, and a lemon cream pie for dessert!

The chicken and orzo were absolutely divine, and I will most certainly use those recipes again. They would be wonderful dishes to serve at a dinner party, or even a casual dinner with guests. Even the lemon cream pie was light and delicious!

I don't usually make pies, for several reasons, but the idea of a lemon cream pie was much more appealing than a lemon cake when I was trying to think of a refreshing summer dessert. I found the recipe (posted below, of course) in the May 2011 issue of my Cooking Light magazine and it immediately appealed to me because it didn't call for me to make my own crust. Making pie crust absolutely terrifies me, mostly because I just can't seem to get it right. This recipe, however, seemed to be easy enough, and it really was! I hope you try it out and enjoy it as much as I did :-)


Ingredients:
1/2 pkg refrigerated pie dough (such as Pillsbury)
Cooking spray
1/2 c sugar
1 tbs grated lemon rind, divided
1/4 c fresh lemon juice
3 tbs cornstarch
1/4 tsp salt
2 lg eggs
1 1/2 c fat free milk
1/4 c (2 oz) 1/3-less-fat cream cheese, softened
2 tbs butter, softened
1 1/2 c frozen fat-free whipped topping, thawed

Roll dough into a 12 inch circle; fit into a 9 inch pie plate coated with cooking spray. Fold edges under, and flute. Bake pie crust according to package directions. Cool completely on a wire rack.

Combine sugar, 2 1/2 tsp rind, lemon juice, cornstarch, salt, and eggs in a large bowl and stir well. Combine milk and cheese in a medium saucepan over medium-high heat. Cook until tiny bubbles form around the edge of the mixture, but do not boil. Gradually add the hot milk mixture to the sugar mixture, stirring constantly with a whisk. Return milk mixture to pan, and cook over medium heat for 10 minutes, or until thick and bubbly, stirring constantly. Remove from heat and stir in butter.

Place pan in a large bowl filled with ice for 10 minutes or until the mixture cools to room temperature, stirring occasionally. Spoon the filling into the prepared crust and cover surface of filling with plastic wrap. Chill for 3 hours or until set, and remove plastic wrap. Spread the whipped topping evenly over chilled pie, and sprinkle with remaining 1/2 tsp lemon rind.

Lemon Cream Pie

Thursday, June 2, 2011

Gingerbread "Whoopie" Pies

I'm always looking for an excuse to try a new "sweet treat" recipe. Unfortunately, my husband doesn't have a sweet tooth, and although I do love running, I do NOT want to live at the gym. Therefore, my excuse to get in the kitchen and bake often comes in the form of house guests!

Our amazing friends the Goddards made the drive from Mebane to Raleigh on Memorial Day weekend to spend a couple of days visiting with us. I always look forward to our visits with Mike and Jen. Not only are they two of the most genuine people I have ever met, they often humor me and eat whatever I happen to whip up in the kitchen. God bless them.

I came across this recipe a few weeks ago. It immediately caught my eye because I love gingerbread, and it seemed to be a recipe that could easily be done as a cute, bite sized treat to serve at a shower, cocktail party, etc.

Jen was nice enough to keep me company in the kitchen and lend a hand in the baking process. We were both delighted with the end result! The whoopie pies were SO yummy. In my humble opinion, the gingerbread cookies were what made the recipe so outstanding. If you like gingerbread, I would definitely recommend trying these. The cookies would be delicious on their own, but who doesn't love a little cream cheese frosting? As always, I've posted the recipe below. Happy baking!

Ingredients:
3/4 c butter, softened
1 c brown sugar, packed
1 egg
1/3 c molasses
2 1/2 c all purpose flour
2 tsp ground ginger
1 1/2 tsp baking soda
1 tsp cinnamon
1/4 tsp salt
sanding sugar (I didn't have this, so I used regular sugar)
cream cheese frosting*

*I would usually make my own cream cheese frosting, but it just seemed easier to buy it this time. So, that's what I did. Thank you very much Betty Crocker.

Preheat oven to 350. In a large  bowl, beat butter and brown sugar at medium speed until fluffy. Add egg and molasses, beat until combined. Set aside.

In a medium bowl combine flour, ginger, baking soda, cinnamon, and salt. Gradually add to butter mixture, beating until combined.

Form dough into 1 inch balls and roll each ball in sanding sugar. Place 2 inches apart on baking sheet and bake 8-10 minutes until lightly browned. Let cool 2 minutes, remove to cooling racks and cool completely. Spread filling evenly on flat side of one cookie, and top with another. (Makes 24 servings)

**As an aside, I would recommend using the bottom of a drinking glass (spray with non-stick cooking spray first) to slightly flatten the balls of dough once placed on the cookie sheet. Thinner cookies might make for whoopie pies that are not quite as "thick" and therefore easier to eat!  :-)

aren't they cute?!