Saturday, September 24, 2011

A Beautiful Baby Shower...

Recently, I had the honor of attending a beautiful book-themed baby shower for my good friend Jessica! It was one of the most darling showers I have ever been to, and it was easy to see that the three hostesses put lots of love and attention into all of the little details. For more on the shower, visit my dear friend Anna's blog, as she was one of the fabulous hostesses!

Having just started her second year of law school, Anna found herself swamped with school work and asked if I wouldn't mind helping her with the dessert table. I jumped at the opportunity to help in any way that I could, and we quickly set about picking some recipes. We settled on gingerbread whoopie pies, truffles, and chocolate bark topped with figs and smoked almonds (specially requested by the mommy-to-be).

I had tried the whoopie pies once before (click here for the post) and loved the flavor but was less than pleased with their appearance. So, I tweaked the process just a bit and this time they came out perfectly! I was thrilled!


I've been holding onto this bark recipe for almost a year now, and was really excited to try it out. I love smoked almonds AND figs, so I wasn't disappointed. In fact, it might be my new favorite chocolate bark! If you're feeling adventurous, give it a try...

Chocolate Bark with Smoke Almonds and Fig:
1 lb semi sweet chocolate
1/2 c smoked almonds, chopped
1/2 c dried figs, chopped
sea salt

Line a cookie pan with wax paper or aluminum foil. Melt chocolate in the microwave in 30 second increments until almost melted, then stir until smooth. Pour the chocolate onto the prepared cookie sheet, and spread into a thin layer using a non-stick spatula. Then immediately sprinkle the chopped almonds and dried figs onto the chocolate layer, presing the toppings lightly into the chocolate. Top with sea salt, and let stand at room temperature until firm. However, if you're in a hurry, you can place the bark in the refrigerator to firm up.

loving the texture from the almonds and figs

isn't it pretty? =) 

I stumbled upon this truffle recipe years ago and have been giving them as little gifts during the holidays ever since. They are always a hit - in fact my sister requests batches of them quite frequently - but they can be time consuming to make. My back always aches after hours of bending over a bowl of melted chocolate, dipping truffles. =) Nonetheless, it makes me happy to bake yummy treats that others genuinely enjoy, so I will probably continue making them forever and ever. Below is the super simple recipe.

Chocolate Oreo Truffles:
1 pkg oreo cookies
1 (8 oz) pkg cream cheese, room temperature
2 (8 oz) pkgs semi-sweet baking chocolate

Place cookies in a food processor and pulse until they are reduced to fine crumbs. Mix all but 1/4 cup of the crumbs into the cream cheese until well blended. *TIP - its significantly faster to mix these using a stand mixer or hand mixer, just be careful not to use a high speed, because you'll end up flinging crumbs all over the kitchen*

Roll the cream cheese mixture into 1 inch balls and place them in the refrigerator for an hour to firm up. Once the truffles have chilled, melt your chocolate in the microwave at 30 second intervals until smooth when stirred. Then line a cookie sheet with wax paper or aluminum foil. Dip each truffle into the melted chocolate and lift out using two forks or spoons - I happen to prefer spoons - then place the dipped truffle onto the cookie sheet and sprinkle with reserved crumbs or chocolate sprinkles (or whatever topping you prefer) before the chocolate sets.

Allow the dipped truffles to chill in the refrigerator for a couple hours, or overnight. Then store in an airtight container and ENJOY!


Friday, September 23, 2011

Birthday Boy

Happy 30th Birthday to my best friend, and the most wonderful husband a girl could ask for!

Friday, August 19, 2011

Pretty Little Things

At 5:00 pm today my vacation officially started. It is the first vacation we've taken since our honeymoon last October, and I think I speak for both myself and my husband when I say that it's LONG overdue. We are leaving tomorrow morning for a week at the beach and I am beyond excited! So excited, in fact, that I did very little "work" today and a lot of daydreaming.

One of my favorite things to do is shop for serving pieces, and today I was captivated by some absolutely beautiful cake stands and bon bon bowls. I've posted some of my favorites!

These first three are by Layla Grayce. I love almost everything by this designer, but I think the pink cake stand is my favorite. It just makes me happy =)

rosanna pink round cake stand

loving the ribbon!

rosanna footed bon bon bowl


Ever since I was a little girl I have loved Hobnail milk glass by Fenton Crystal. These are two pieces I've been dying to have. Hopefully I'll be adding them to my collection soon!

the ruffle detail is beautiful

stunning...

I'm not quite sure who makes these cake plates, but I immediately fell in love with the beautiful colors in this photograph. The stands are lovely, and the cakes are exquisite. Love =)


Saturday, August 13, 2011

Weekend on the River

Last weekend, my dear friend Lillian and I drove to Southport, North Carolina to visit our oh-so-fabulous friend, Eric. Southport is a beautiful and charming town on the coast, and back in June Eric left Raleigh to make Southport his new home. We've missed him terribly ever since, so we seized the first opportunity we had to take a road trip and visit!

We decided to put together a housewarming gift, so Lillian swung by Midtown Olive Press and chose a delightful gourmet olive oil and misto, while I got to work on my contribution: Creamy Apricot Chocolate Truffle Bars.

The layers of shortbread, truffle, and mascarpone were quite delicious but didn't firm up as much as I thought they would, once chilled. Nevertheless, I do believe they were a hit, and would be just as delicious with a variety of fruits: raspberry, strawberry, fig, etc. I've posted the recipe below, along with a photo tour of our amazing weekend in Southport! Enjoy! =)

Base Ingredients:
1 c butter, softened
1/2 c powdered sugar
1/4 tsp salt
1 1/4 c AP flour
1/2 c chopped walnuts

Heat oven to 350 degrees and spray a 13x9 inch pan with non-stick cooking spray.

In a medium bowl beat the butter, powdered sugar and salt together with an electric mixer on medium speed until light and fluffy. Then, turn the mixer to low speed and gradually beat in the flour until a dough forms. Stir in walnuts and spread mixture into prepared pan. Bake 15-20 minutes or until golden brown. Cool completely and set aside.

  walnut shortbread bottom, done!


Truffle Ingredients:
1 (14 oz) can sweetened condensed milk
1 (12 oz) bag dark chocolate baking chips
2/3 c apricot preserves (or any other fruit preserve you might prefer to use)

In a medium bowl, microwave milk and chocolate chips for one minute, then stir. If chips are not completely melted after stirring, microwave in 15 second increments, until smooth. Stir in fruit preserves and spread over cooled shortbread base. Refrigerate 1 hour or until set.
truffle ingredients

apricot truffle layer, done!

Topping Ingredients:
1 (8 oz) container mascarpone cheese
1 1/3 c sugar
2/3 c whipping cream
1 tbs fruit preserve

In a medium bowl, beat cheese, sugar, and cream on medium speed until smooth. Then beat on high speed until mixture is thick. Stir in fruit preserve and spread over truffle layer. Refrigerate one hour or until chilled. Cut into bars and serve.

mascarpone topping, done!

bon apetite!
(i just LOVE the layers - aren't they pretty?!)


We arrived rather late in the evening on Friday, so Eric graciously entertained us at his adorable new home. After a quick tour, we settled onto his back porch to enjoy some cocktails and good company. Lillian and I immediately fell in love with Eric's new place. It has so much character, and is nestled in the heart of one of the most darling, tree-lined streets I've ever seen!

Eric's charming river cottage

front porch: antique church bench - love it!
(this bench came from Eric's grandmother's church, and his father refinished it for him)

screened in porch - love the white wicker!

Saturday morning, Eric took us for a tour of downtown Southport. We walked along the main street, which sits right on the water, and meandered in and out of antique shops and charming boutiques. I was in heaven!

After exploring the downtown area, we headed over to Provision (one of Eric's favorites) for a quick lunch. I loved this place! It's quite small, but all seating is outside on their covered deck, and the restaurant sits right on the water. In fact, you can dock your boat and come right up for a bite to eat or a drink - very neat. We all ordered the crab cake sandwich, and quickly agreed it was one of the freshest and most delicious crab cakes we've ever had.

lunch on the water...

Eric and Lil  =)

the view from our table

After lunch we crossed the bridge to Oak Island for a quick tour of the area where Eric works. The island is beautiful, and I would love to come back with Jason at some point and spend a beach weekend there. As an aside, I am beyond envious that he gets to work blocks from the beach everyday.

Once we arrived back in Southport, we headed over to Old American (another of Eric's favs) to enjoy a glass of vino and the beautiful weather! This particular place actually extends out over the water and again, all of the seating is outside. As we were sitting at our table, I looked down through the wooden planks of the deck and could see the water move beneath my feet. I could really get used to that! Perhaps Jason and I should move to the coast. Hmmm...

afternoon cocktails on the water
(i love how EVERYTHING in Southport is on the water)

would love to be sailing...

view from Old American - perfection

The perfect ending to a delightful day was our dinner at Mr. P's Bistro along the main street in Southport. It is a small, family owned restaurant (the owner's daughter was our server) and it has an incredible menu! After much deliberation, I decided on the crab-stuffed salmon with fried green tomatoes and horseradish roasted red potatoes. There are no words, really... I'll just say it was one of the best meals I've had in a really long time.


best.dinner.ever.

with two of my favorite people

Sunday morning we were on the road and headed back to Raleigh. It was an absolutely lovely weekend in Southport, and for anyone who hasn't been, I must insist you spend a weekend there. The town will certainly steal your heart! I can hardly wait to start planning my next visit =)

Wednesday, July 27, 2011

Strawberry Crumb Bars

Quite possibly, one of my favorite things about summer is all of the beautiful, fresh fruit available for my eating and baking pleasure. I like to pretend that it makes up for the sweltering heat we suffer through every year in North Carolina...

So, as I perused the produce section at the grocery store last week, I was delighted to notice that strawberries were on sale! I simply couldn't resist buying as many as I thought I could fit in our refrigerator. I absolutely love strawberries, and could (shamefully) sit down and eat a pound of them all by myself. However, I happen to be the only one in my house that loves them, so I had to find a good use for them before they went to waste.

After searching recipe books, websites, and blogs I stumbled upon a strawberry crumb bar recipe, courtesy of Can You Stay For Dinner.

strawberry crumb bars

Don't they look amazing?! Honestly, they taste even better than they look. This is a perfectly refreshing treat that can be served as a dessert or enjoyed in the morning with a nice cup of coffee. I imagine it would be equally delicious with many other types of fruit: blueberries, peaches, etc. I hope you try it, and enjoy it as much as I did! Happy baking!!

Ingredients:
1 2/3 c sugar, divided
1 1/4 tsp baking powder
3 c AP flour
1 c butter, cold and diced into small pieces
1 egg, lightly beaten
1/4 tsp salt
Juice and zest of one lemon
5 c chopped fresh strawberries
1 tbs plus 2 tsp cornstarch

Preheat oven to 375 and line a 13x9 inch baking pan with aluminum foil, allowing for an overhang so that you can remove the bars easily from the pan. Coat foil with nonstick cooking spray.

Whisk 1 cup plus 2 tablespoons sugar, 3 cups flour, baking powder, salt, and lemon zest together in a large bowl. Use a fork to blend in the cold butter and egg. Once blended, the dough should be crumbly. Pat approximately half of the dough into your prepared pan.

In a separate bowl, stir together the remaining 1/2 cup sugar, lemon juice, strawberries, and cornstarch. Evenly spread the strawberry mixture over the crust. Then crumble the remaining dough over the berry layer.

Bake for 45 minutes, or until golden brown. Let the bars cool completely in the pan before cutting into squares.


Sunday, July 17, 2011

Cookie Dough Brownies

I recently realized that we had a package of brownie mix sitting in our pantry, just begging to be used. Since we don't usually keep sweets in our house for no good reason I was perplexed when I stumbled upon them, but decided to take it as an opportunity to experiment!

I began flipping through my trusty recipe box and found a cookie dough truffle recipe I had tried sometime last year. I thought to myself, I love cookie dough, and I love brownies, so why not?! I simply took the cookie dough recipe from the truffles and decided to make a sort of "filling" for the brownies. For the top chocolate layer I would typically use Baker's chocolate, but I had half a bag of mini chocolate chips leftover and it just made sense to use those instead. They worked perfectly.

My brother, sister, and brother-in-law kindly indulged me in taking on the jobs of taste testers, and they gave the brownies RAVE reviews! My husband even had a few bars, which is a big deal for those of you that know him... and his complete lack of a sweet tooth! :-) Enjoy and happy baking!

Ingredients:
1 pkg fudge brownies
1 c butter, softened
1 c packed brown sugar
4 tbs milk
2 tsp vanilla
1/2 c white sugar
2 c AP flour
2 c mini chocolate chips, divided
1 tbs Crisco

Begin by baking the brownies in a 13x9 inch dish according to the directions on the package. Once they are done baking, allow them to cool completely before moving on to the next step. If I'm really in a hurry, it helps to put them in the refrigerator or freezer for just a few minutes.

For the cookie dough filling, combine the butter, brown sugar, white sugar, milk, and vanilla together in a large bowl. Cream these 5 ingredients together, add the flour, and stir to combine. Once the flour is fully incorporated into the batter, add 1 cup of the mini chocolate chips and stir to combine them evenly into the batter. Spread the cookie dough mixture onto the cooled brownies and chill for 15 minutes.

For the chocolate topping, melt the remaining 1 cup mini chocolate chips with 1 tablespoon Crisco. If you're like me, you cringe at the very idea of using Crisco, but it will help keep the chocolate shiny and pretty! Try heating them together in the microwave for 30 seconds and then stir. If the chips don't melt together when stirred, continue heating in the microwave at 15 second increments. Once melted, spread over the cookie dough and chill until set. Then cut into bars and enjoy!

Saturday, July 9, 2011

Happy Independence Day!

I hope everyone had a happy and safe Fourth of July! Jason and I spent the holiday weekend visiting my family in Charlotte. It was such a treat to have everyone together for a long weekend of fun and celebration. First on the agenda was a visit to Mom's house where we enjoyed a delicious dinner on Friday evening, followed by a Saturday afternoon filled with lunch, shopping for fabric, and (my personal favorite) polishing some of mom's beautiful silver serving pieces! She has acquired quite a large collection over the years, and every time we get her silver out I fall in love with a new piece. =)

We spent the rest of the weekend at Dad & Jackie's house. On the agenda: Saturday evening cocktails at Selwyn Pub with the siblings and spouses, a Sunday afternoon belly flop contest for the men (yes, you read that right), followed by a yummy cookout courtesy of my Dad and Step mom, and then on to the National Whitewater Center for lunch and rafting on Monday. The whitewater center was REALLY neat (its where the US kayak/canoe Olympic teams train) and I can't wait to go back. Jason and I are dying try out their canopy tour! 

It was a fun-filled weekend and wouldn't have been complete without trying a new dessert recipe! I decided to make a Key Lime Pound Cake, and was quite pleased with how it turned out. I've posted the recipe below, along with some photos from the weekend!

bon bon spoon - my new favorite!

Me and Jason at Selywn Pub

my Sunday tanning and napping locale...
until I was interrupted by the boys =)

my brother-in-law, belly flopping


Key Lime Pound Cake - this cake is lovely and refreshing, and a great summer dessert option! It was just a little bit sweet, a little bit tart, but very velvety and super yummy. The only thing that disappointed me was finding that most of the glaze dripped onto the cake plate. I will probably make this cake again, and just play with different ways to ice it, so as to not lose most of the glaze. Enjoy and happy baking!

Cake Ingredients:
1 c butter, softened
1/2 c shortening
3 c sugar
6 large eggs
3 c all purpose flour
1/2 tsp baking powder
1/8 tsp salt
1 c milk
1 tsp vanilla
1 tsp lime zest
1/4 c fresh key lime juice

Preheat your oven to 325 degrees. In a large bowl, beat the butter and shortening together until creamy. Then, gradually add sugar (beating at medium speed) until light and fluffy. Add eggs, one at a time, beating until just blended together after each addition.

In a separate bowl, stir together flour, baking powder, and salt. Add the flour mixture to the butter mixture alternately with the milk. Be sure to begin and end with the flour mixture. Beat at low speed just until blended after each addition. Then, stir in the vanilla, lime zest, and key lime juice. Pour the batter into a greased and floured bundt cake pan, and smooth the top with a spatula.

Bake for 1 hour and 15 minutes or until a tester inserted in the center comes out clean. *I checked on the cake at 1 hour and then every 10 minutes afterwards until it was done* Cool in the pan on a wire rack for about 15 minutes, then remove the cake from the pan to a wire rack or cake stand.

Prepare key lime glaze (recipe below) and immediately drizzle over the top and sides of cake. Cool completely.

Glaze Ingredients:
1 c powdered sugar
2 tbs key lime juice
1/2 tsp vanilla

Whisk all 3 ingredients together in a small bowl, and use immediately.

key limes, so much smaller than I expected!

ready for the oven

glazed and ready to eat

Monday, June 27, 2011

Strawberry Cake

For weeks now I have been dying to try two things: a new strawberry cake recipe and decorating with buttercream roses! This kind of decorating is new territory for me, but with the birthday of our friend Jen taking place this past weekend, it was the perfect opportunity to celebrate her pre-30th birthday AND do some experimenting. Here's a preview of the finished product... see below for more details!

strawberry rosette cake


Cake Ingredients:
2 3/4 c AP flour
1/2 c cake flour (not self rising)
1 tbs baking powder
1 tsp salt
2 sticks butter, softened
2 1/4 c sugar
3 large eggs
1 large egg white
1 c whole milk (I used skim, and it worked fine)
1 1/2 tsp vanilla
2 c chopped fresh strawberries or pureed frozen strawberries

Preheat your oven to 350 degrees. Meanwhile, whisk dry ingredients together in a large bowl and set aside. Cream the butter and sugar with a hand mixer until it becomes light and fluffy. Add each egg, one at a time, and beat after each addition just until the egg has been incorporated. Beat in egg white.

Combine the milk and vanilla in a separate bowl and set aside. Add the dry ingredients to the butter mixture on low speed in 3 additions, alternating with the milk mixture, and ending with dry ingredients. Finally, stir the strawberries into your batter.

batter, pre strawberries


batter, post strawberries
(it was SO difficult to resist taking a little taste)

Grease two 9 inch round cake pans and fill each pan evenly with batter. Bake in the oven until a tester comes out clean. I'll be honest with you, I didn't watch the clock very closely (I know, shame on me) so I couldn't tell you precisely how long it took for the cakes to bake. I'd recommend checking on them at 20 minutes and then every few minutes afterwards until they are done. Remove the cakes from the oven and let cool completely on a wire rack.

While the cakes are cooling, make your buttercream according to the following recipe.

Buttercream ingredients:
2 c shortening
8 c powdered sugar
1/2 tsp salt
1 tbs vanilla
6 oz heavy cream
1/2 c finely chopped strawberries

In a large bowl, cream the shortening with a hand mixer until light and fluffy. Add the powdered sugar, 2 cups at a time, until well blended. About halfway through this process, my frosting got VERY thick and difficult to work with, so I added a little bit of the cream to soften it up. After all of the sugar has been incorporated add the salt, vanilla and remaining heavy cream. Blend until combined, then mix on high until the frosting is light and fluffy. Fold in strawberries. **This makes A LOT of frosting, which is needed for the rosettes, but if you will simply be icing a cake, you might consider cutting this recipe in half.**

Once the cakes have cooled, assemble your layers and cover in a good crumb coat. It does NOT need to be pretty, it just needs to be thick enough so that you aren't able to see any cake through the frosting. Example:


On to the really fun part! Assemble a pastry bag fitted with a Wilton 1M decorating tip, and fill the bag about half full with frosting. Work around the side of the cake first. Beginning in the center of the rosette, hold your decorating tip at a 90 degree angle to the cake, and make a circle around the center point. You will likely need to loop around twice so that the rosettes cover the height of the side of your cake. Once you've made your way around the entire cake, it should look something like this:
half-way there...

Next, cover the top of your cake using the same method.

ta-da! all finished.

The roses weren't as neat and tidy as I would have liked. However, considering this is my first attempt, I'm pretty happy with how it turned out.

I think the roses would hold their shape better with a less creamy/more stiff buttercream. That's something to look into for next time. Until then, have fun and happy baking! :-)

up close detail


pretty AND delicious!

Sunday, June 19, 2011

Happy Father's Day Weekend

Happy Father's Day to the most amazing father, friend, and role model that a girl could ever ask for. Love you... xoxo!


It's only when you grow up, and step back from him, or leave him for your own career and your own home—it's only then that you can measure his greatness and fully appreciate it. Pride reinforces love.  ~ Margaret Truman

Wednesday, June 15, 2011

When life hands you lemons...

You make lemonade, and lots of other yummy treats!

Every Sunday I do our grocery shopping for the week, and this past weekend I couldn't help but notice that lemons were on sale. So, on impulse, I bought a bag full of them. I know it sounds strange, but I love everything about lemons: I love the smell of freshly squeezed lemon juice, I love their bright and cheerful color, and I love how they make me think of summertime.

I immediately came home from the store and decided on a lovely...and lemony... menu for one of our weeknight dinners. In celebration of our newly painted kitchen (more on that later), and since I was home from work just a tad earlier than usual, tonight worked out perfectly. On the menu: chicken piccata, lemon orzo, and a lemon cream pie for dessert!

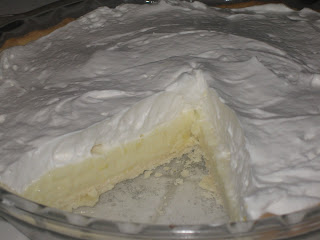
The chicken and orzo were absolutely divine, and I will most certainly use those recipes again. They would be wonderful dishes to serve at a dinner party, or even a casual dinner with guests. Even the lemon cream pie was light and delicious!

I don't usually make pies, for several reasons, but the idea of a lemon cream pie was much more appealing than a lemon cake when I was trying to think of a refreshing summer dessert. I found the recipe (posted below, of course) in the May 2011 issue of my Cooking Light magazine and it immediately appealed to me because it didn't call for me to make my own crust. Making pie crust absolutely terrifies me, mostly because I just can't seem to get it right. This recipe, however, seemed to be easy enough, and it really was! I hope you try it out and enjoy it as much as I did :-)


Ingredients:
1/2 pkg refrigerated pie dough (such as Pillsbury)
Cooking spray
1/2 c sugar
1 tbs grated lemon rind, divided
1/4 c fresh lemon juice
3 tbs cornstarch
1/4 tsp salt
2 lg eggs
1 1/2 c fat free milk
1/4 c (2 oz) 1/3-less-fat cream cheese, softened
2 tbs butter, softened
1 1/2 c frozen fat-free whipped topping, thawed

Roll dough into a 12 inch circle; fit into a 9 inch pie plate coated with cooking spray. Fold edges under, and flute. Bake pie crust according to package directions. Cool completely on a wire rack.

Combine sugar, 2 1/2 tsp rind, lemon juice, cornstarch, salt, and eggs in a large bowl and stir well. Combine milk and cheese in a medium saucepan over medium-high heat. Cook until tiny bubbles form around the edge of the mixture, but do not boil. Gradually add the hot milk mixture to the sugar mixture, stirring constantly with a whisk. Return milk mixture to pan, and cook over medium heat for 10 minutes, or until thick and bubbly, stirring constantly. Remove from heat and stir in butter.

Place pan in a large bowl filled with ice for 10 minutes or until the mixture cools to room temperature, stirring occasionally. Spoon the filling into the prepared crust and cover surface of filling with plastic wrap. Chill for 3 hours or until set, and remove plastic wrap. Spread the whipped topping evenly over chilled pie, and sprinkle with remaining 1/2 tsp lemon rind.

Lemon Cream Pie

Thursday, June 2, 2011

Gingerbread "Whoopie" Pies

I'm always looking for an excuse to try a new "sweet treat" recipe. Unfortunately, my husband doesn't have a sweet tooth, and although I do love running, I do NOT want to live at the gym. Therefore, my excuse to get in the kitchen and bake often comes in the form of house guests!

Our amazing friends the Goddards made the drive from Mebane to Raleigh on Memorial Day weekend to spend a couple of days visiting with us. I always look forward to our visits with Mike and Jen. Not only are they two of the most genuine people I have ever met, they often humor me and eat whatever I happen to whip up in the kitchen. God bless them.

I came across this recipe a few weeks ago. It immediately caught my eye because I love gingerbread, and it seemed to be a recipe that could easily be done as a cute, bite sized treat to serve at a shower, cocktail party, etc.

Jen was nice enough to keep me company in the kitchen and lend a hand in the baking process. We were both delighted with the end result! The whoopie pies were SO yummy. In my humble opinion, the gingerbread cookies were what made the recipe so outstanding. If you like gingerbread, I would definitely recommend trying these. The cookies would be delicious on their own, but who doesn't love a little cream cheese frosting? As always, I've posted the recipe below. Happy baking!

Ingredients:
3/4 c butter, softened
1 c brown sugar, packed
1 egg
1/3 c molasses
2 1/2 c all purpose flour
2 tsp ground ginger
1 1/2 tsp baking soda
1 tsp cinnamon
1/4 tsp salt
sanding sugar (I didn't have this, so I used regular sugar)
cream cheese frosting*

*I would usually make my own cream cheese frosting, but it just seemed easier to buy it this time. So, that's what I did. Thank you very much Betty Crocker.

Preheat oven to 350. In a large  bowl, beat butter and brown sugar at medium speed until fluffy. Add egg and molasses, beat until combined. Set aside.

In a medium bowl combine flour, ginger, baking soda, cinnamon, and salt. Gradually add to butter mixture, beating until combined.

Form dough into 1 inch balls and roll each ball in sanding sugar. Place 2 inches apart on baking sheet and bake 8-10 minutes until lightly browned. Let cool 2 minutes, remove to cooling racks and cool completely. Spread filling evenly on flat side of one cookie, and top with another. (Makes 24 servings)

**As an aside, I would recommend using the bottom of a drinking glass (spray with non-stick cooking spray first) to slightly flatten the balls of dough once placed on the cookie sheet. Thinner cookies might make for whoopie pies that are not quite as "thick" and therefore easier to eat!  :-)

aren't they cute?!

Sunday, May 29, 2011

Friday with Friends

On Friday night, Jason and I were graciously invited to have dinner with our dear friends, the Whites. Always the epitome of a perfect hostess, Anna's dining room table was impeccably dressed (everyone knows I can't resist a lovely place setting), and she had put together a delectable menu consisting of her sunny summer salad, chicken with lemon leek linguine, and a homemade apple & pear crisp for dessert. As an extra special treat, Landon decided to do chicken wings on the grill with a "special" hot sauce for himself and Jason to enjoy.

The meal was absolutely divine, and the company was delightful! Jason and I look forward to returning the favor and hosting our next "Friday with Friends" get together at our place!

beautiful place setting - LOVE it!

our fabulous host and hostess 

chicken with lemon leek linguine

Landon's "special" wings - they look hot!

apple & pear crisp